When we launched the new website in October 2016, several significant changes were made to the way in which Approved Certifiers generate certificates for staged projects. Additionally, the changes that were made to the Schedule 1/Form Q process means that a larger proportion of projects will be staged going forward. Our first proper blog therefore provided advice on certifying staged projects.
Although we are aware that many Bodies and Certifiers read the original blog and have indeed adopted the advice contained in it, we have found that we still regularly refer Certifiers to it when they contact us with stage-related queries. We are therefore re-issuing the blog this week, including an expanded section relating to only including the stages that you are certifying (plus those you have already certified), with future stages being entered under ‘Items to be certified in a later stage’.
To begin, if you take one thing from this article, it should undoubtedly be this: each certificate generated within the new system should be a snapshot of the entire project at the point of generation. If you keep this in mind, and generate each certificate as if it were the only valid certificate for the project, it will help you to resolve a great many queries in terms of what a staged certificate should cover, what project value should be entered onto a staged certificate etc. This advice will be repeated several times within this blog, and is likely to crop up in future blogs too; the idea of the certificate as a snapshot of the entire project applies to all circumstances.
Jump to:
Project Description
Project Value
Stage Information
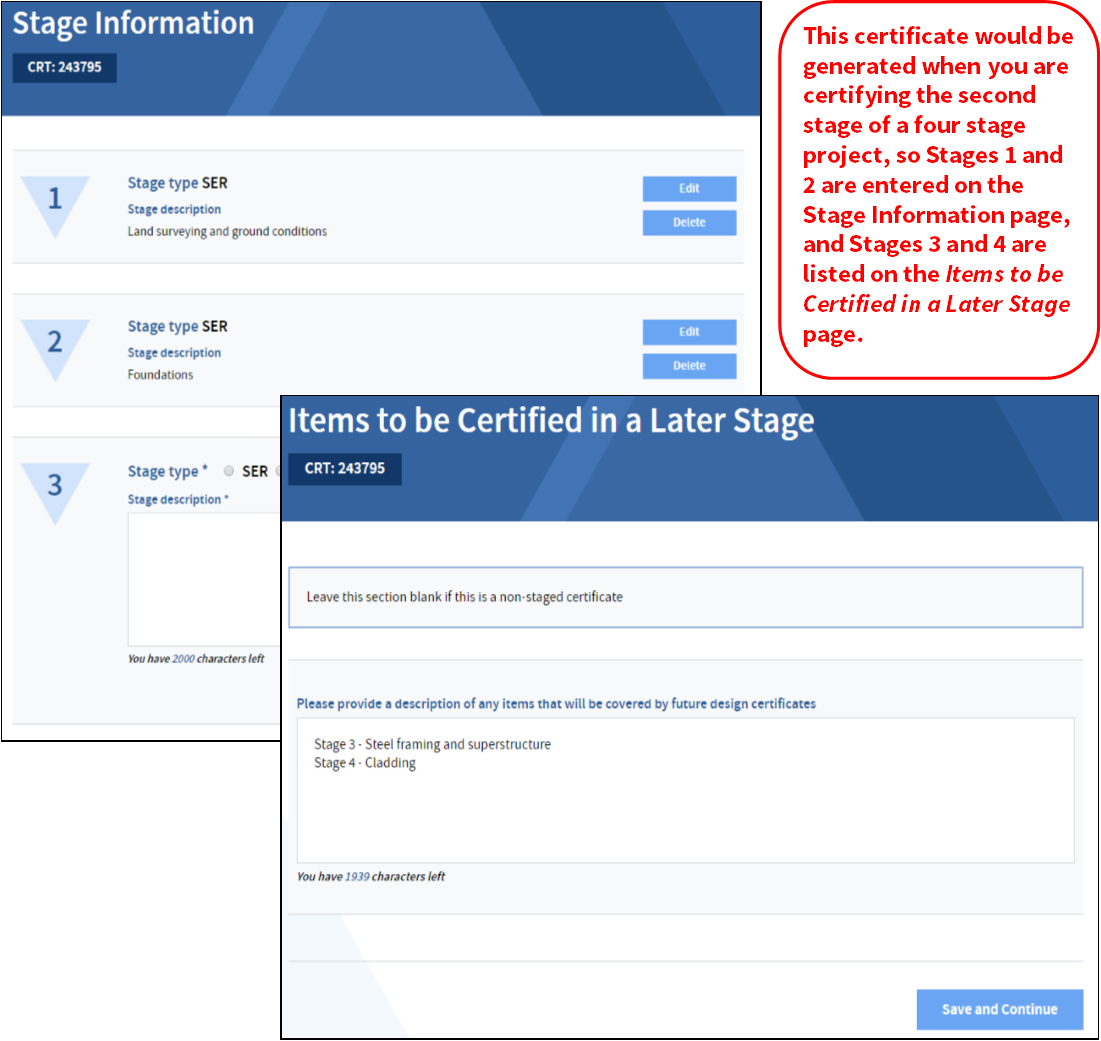
How to enter stages that you are not ready to certify onto a certificate
Schedule 1 - Third party designed details
Schedule 2 - Design Features
List of Information Used for the Purposes of Certification
Items to be Certified in a Later Stage
Generating an amendment to warrant to a staged project
Project Description
This should be a description summarising the entire project, and it is advisable that this matches the description on the warrant application as closely as possible.
Project Value
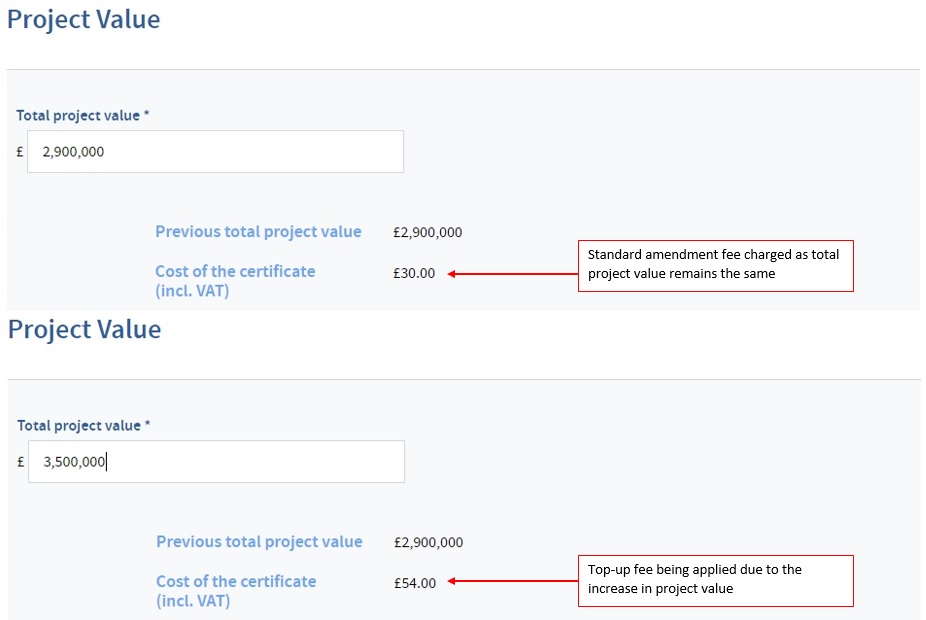
We’re going to mention that word again… as each certificate is a ‘snapshot’ of the entire project at the point of generation, you should ensure that you enter the full project value on all certificates rather than a cumulative total or one broken down into the value of each stage.
If you are certifying a project which will contain 6 stages and which has an estimated total project value of £10m, this is the amount that you enter on every certificate you generate for the project as long as the estimated project value remains unchanged. You should never enter the value for each individual stage. If during the course of the certification process the project value rises to £12m, that is the project value you should enter for each additional certificate (rather than £2m).
Stage Information
There are several points to note regarding this section.
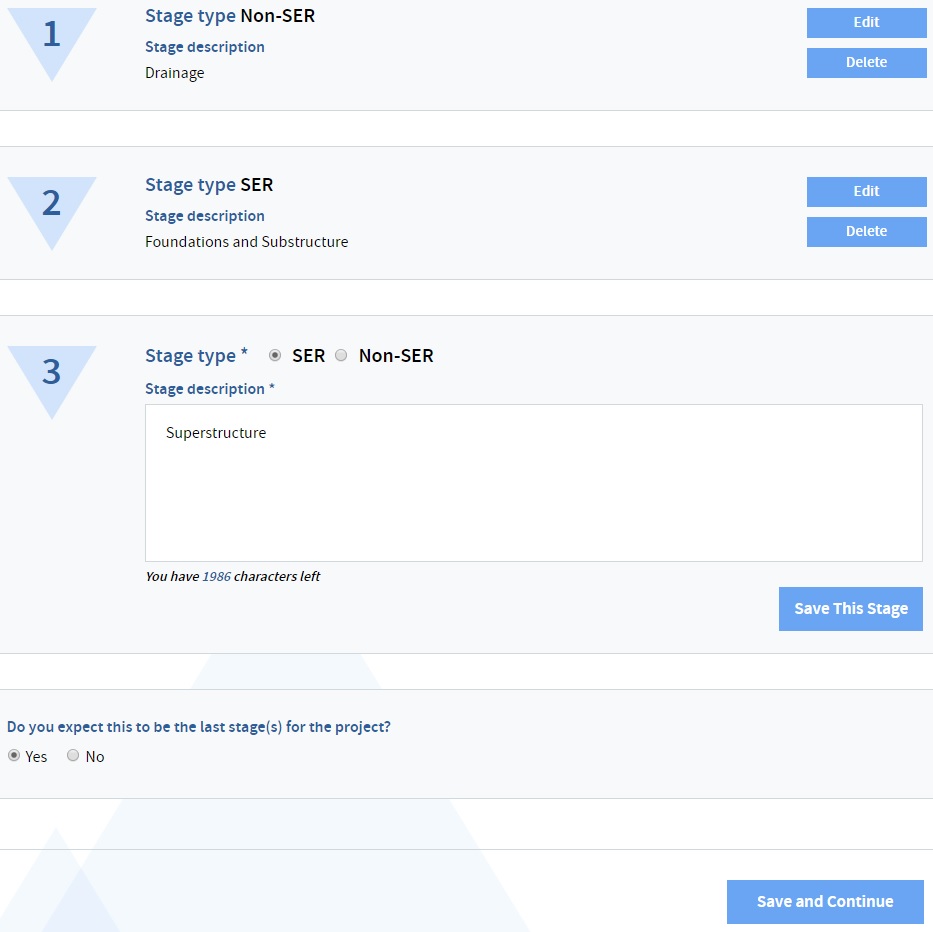
First is the addition of being able to enter ‘Non-SER’ stages to a project. We introduced this feature so that SER certificates could match warrant submissions more closely.
If, for example, stage 1 of a submission relates to drainage, with stage 2 relating to foundations, in the old system you in effect ignored Stage 1 and skipped straight to stage 2. If Certifiers forgot to change the stage number when generating the certificate for the foundations then complicated staged projects could get extremely messy. Now, however, when a Certifier is ready to certify the foundations, they can first add the drainage as a ‘non-SER’ stage 1. This stage is not certified, and no other reference needs to be made to it; it is included purely to make it easier for Verifiers to cross-reference stage numbers.
A small point to add, based on queries we have received, is that the idea is not that you would ever generate a certificate solely to add a non-SER stage. In the example above, you would not generate a Stage 1 certificate for the drainage, pay the fee for the certificate and then add the Stage 2 (and pay a further fee!) later. Instead, it is intended that you only add non-SER stages at the same time as adding/amending a certifiable stage.
This leads neatly to another feature: you can now add or amend multiple stages to a single certificate. Usually the circumstances which require this functionality would be as above, with a Certifier wishing to add a non-SER stage at the same time as an SER stage. However, there are occasions where for admin reasons a Certifier is ready to certify more than one SER stage at once. In the old system this would require the Certifier to generate 2 new certificates, but now they can add both to a single certificate. You can also edit previous stages at the same time as adding new ones.
A common error we have noticed when adding multiple stages is that Certifiers forget to select ‘Save This Stage’ after each stage they enter. This is an easy mistake to make, particularly as the button to move to the next screen is labelled ‘Save and Continue’, but unless you have first selected ‘Save This Stage’ for each stage added, the stage description for the latest stage added will be lost.
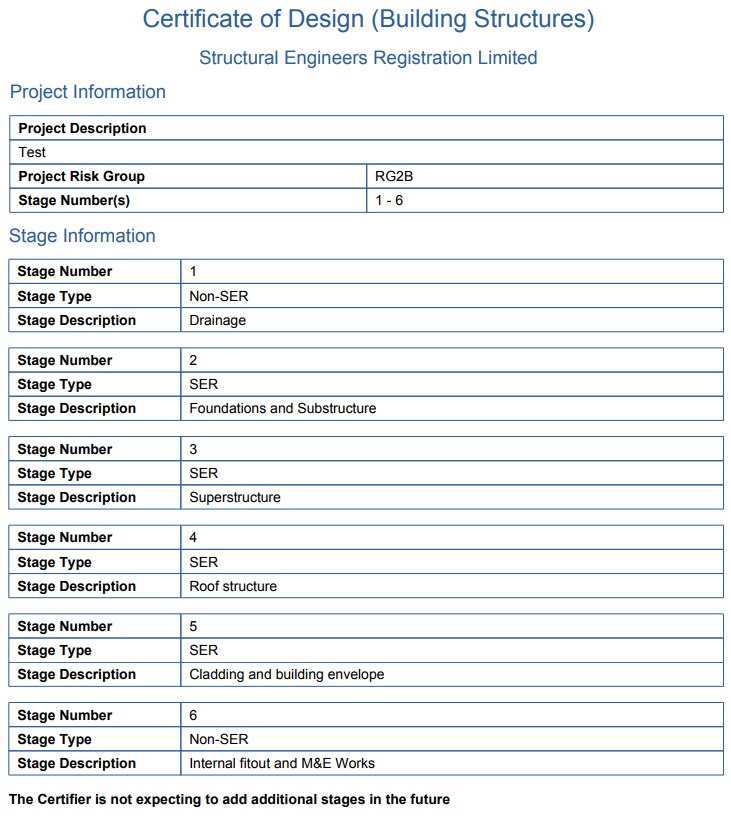
There is in effect only one current certificate for an entire staged project at any one time. In the old system, a 6 stage project would have 6 separate certificates, each covering a single stage. In the new system, each certificate covers the entire project up to that point, so the final certificate would cover stages 1-6 rather than merely stage 6. The key word once again is ‘snapshot’. Before proceeding from the Stage Information screen, look at the stages you have entered and ask yourself whether they adequately represent the entire project as it stands.
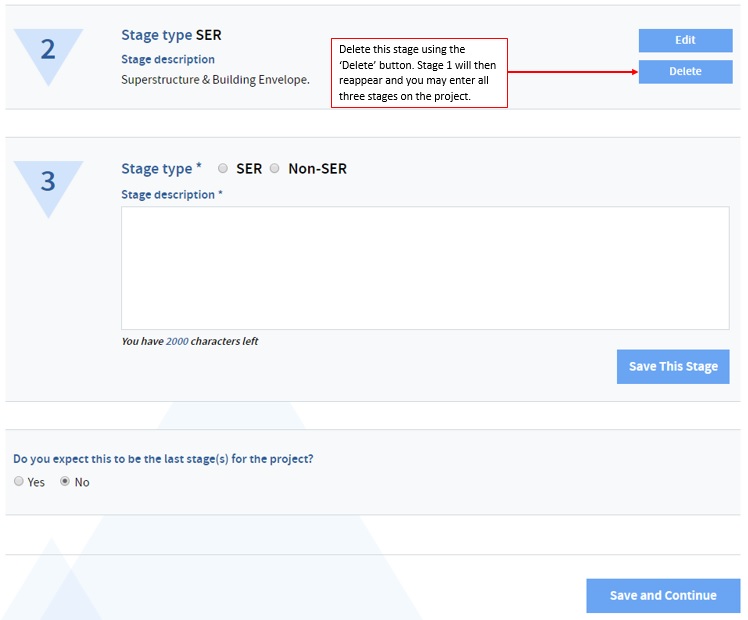
This is particularly important when generating an additional stage to a project for which the previous certificate was generated in the old system, or when generating an amendment to warrant for a staged project which was generated in the old system. If, for example, you were looking to generate a stage 4 to a project which had 3 separate certificates for the previous stages in the old system, when you select to generate an additional stage, the system will link the new certificate to the stage 3 (as this is the latest certificate). Therefore, the pre-populated Stage Information will only contain the stage 3, with stages 1 and 2 missing. In order to make the new certificate a valid ‘snapshot’, rather than merely adding the stage 4, you will first need to delete the stage 3 and enter all 4 stages separately. This is admittedly slightly convoluted, but is only an issue when certifying staged projects which began in the old system; as such in time this problem will disappear!
How to enter stages that you are not ready to certify onto a certificate
This is almost certainly the most common mistake that Certifiers make when generating certificates. In the Stage Information section of the certificate, you should only enter the stage(s) that are to be certified within that certificate. For example, when generating the first certificate for a project, you may know that there will eventually be 6 stages, but if you are only in a position to certify Stage 1, that is the only stage you should add in this section. Instead, you add the information for Stages 2-6 to the final section of the certificate entitled ‘Items to be certified in a later stage’.
If you entered all six stages for the project under ‘Stage Information’ when creating this first certificate, you are in effect certifying all six stages for the project on that certificate!
Schedule 1 – Third party designed details
By now you can probably guess the key word that applies to this section. If stage 1 had items included on Schedule 1 (oh, and a quick general reminder here: all Schedule 1 items should also be included on Schedule 2!), but by the time you are ready to certify stage 2 you have already received the design information for those items, they should not be included on the Schedule 1 to the new certificate, as it should be a snapshot of the project at that time.
It is extremely important to note, however, that in such instances, you will need to include these items in the certification process rather than simply removing them from the Schedule 1.
We would refer both Certifiers and Verifiers to Certification Performance Criteria B1.4 regarding the use of Schedule 1 for staged projects.
Certification using this procedure should not normally be used where the warrant is staged; however, where ground improvement works such as piling or vibro stone or concrete columns form part of the stage 1 submission, or where steelwork connections form part of the stage which includes the associated steelwork, these elements alone may be listed. Other third party design items listed in the tables in Certification Performance Criteria B1.4 may not be included on the Schedule 1 on staged certificates.
Schedule 2 – Design features
Snapshot. The Schedule 2 is cumulative, and it also pre-populates with the information entered on previous certificates. This means that you should only need to add the Schedule 2 items relevant to that stage. However, if creating an amendment to a staged project you may need to also check whether any pre-populated items need to be removed.
List of Information Used for the Purposes of Certification
If you choose to manually add a list, this will pre-populate with the items entered onto the previous certificate(s), so you will only need to add the items relevant to the stages that you are adding. You can also remove any items that are no longer applicable.
If you prefer to upload the list, you will need to upload an up-to-date list with each new staged certificate. If you do choose to upload a list, please be aware you are required to submit a copy of this list along with the certificate.
Items to be Certified in a Later Stage
The idea is that this list gets shorter with each certified stage. As this section pre-populates, Certifiers should be aware that they will need to delete stages from this list as they go. If, for example, you generated a stage 1 certificate for foundations, the list of Items to be Certified in a Later Stage might include ‘stage 2 – substructure’ and ‘stage 3 – superstructure’. When certifying the substructure, you should ensure that reference to this is deleted from the Items to be Certified in a Later Stage so that it now only lists ‘stage 3 – superstructure’. Similarly, when then generating the stage 3, if this is to be the last stage then this section should be blank. If, however, there is subsequently an amendment to warrant, you will still be able to add additional stages if necessary. Which leads us neatly to the final section of this blog:
Generating an amendment to warrant to a staged project
The principle is the same as in almost every section above. You can add, amend or delete as many stages as you want. In the old system, if the amendment to warrant affected items in Stages 1 to 3, you needed to generate (and pay for) 3 separate amendment certificates. In the new system, however, you can make all necessary amendments via a single new certificate.
Hopefully we have clarified the major issues with creating certificates for staged projects. Effectively, before confirming a certificate, take the time to look at the draft certificate. Would you be happy with it if it was the only valid certificate for the project at that point? Does it include all the information that is relevant for the project as it stands today? If so, go ahead and pay for it; if not then refer back to this blog or contact [email protected] for further assistance. And sincere apologies to anyone that wakes in the middle of the night with the word ‘snapshot’ on a loop in their head.
Return to top